02 Mar 2023

2023 03 02 Sci Fi Story by Chatgpt

Chapter #1

The group of actors had been selected to film a futuristic movie on a remote planet known as Zork. Upon arrival, they couldn’t help but feel a sense of déjà vu as the planet’s landscape appeared eerily familiar. They were instructed to keep a low profile while they scouted locations for the movie, so they decided to hide out in a nearby cave system. As they explored deeper into the caverns, they stumbled upon a hidden chamber filled with strange and mysterious artifacts. The main character couldn’t resist the temptation and began scouring through the strange objects, hoping to find something valuable. After a while, he came across a small metallic device with a peculiar emblem that he had never seen before. He quickly realized that it was an item from an intergalactic auction website he had heard of, and he convince the rest of the group to help him find more valuable items to take back with them to Earth. The hunt for rare and exotic items became an obsession for the group, and they soon found themselves risking everything to obtain their prized possessions.

02 Mar 2023

2023 03 02 STTTTTS Speech to text to text to speech (ChatGPT)
import openai
import requests
import os
import time
from gtts import gTTS
from pydub import AudioSegment

# Set up the OpenAI API credentials
openai.api_key = '<your-api-key>'

# Define the path to the audio file to be converted to text
AUDIO_FILE_PATH = '/path/to/sample.mp3'

# Define the request payload to convert audio to text using OpenAI Speech
response = openai.Completion.create(
  engine="davinci",
  prompt=f"Transcribe the following audio file: {AUDIO_FILE_PATH}",
  audio=open(AUDIO_FILE_PATH, "rb").read(),
  max_tokens=2048
)

# Extract the text output from the OpenAI Speech response
text_output = response['choices'][0]['text']

# Define the message to send to ChatGPT
message = text_output

# Define the request payload to send message to ChatGPT using Whisper
WHISPER_API_ENDPOINT = 'https://api.whisper.ai/v1'
WHISPER_ACCESS_TOKEN = '<your-whisper-access-token>'
payload = {
    'access_token': WHISPER_ACCESS_TOKEN,
    'message': message,
    'to': 'ChatGPT'
}

# Send the request to the Whisper API to send message to ChatGPT
response = requests.post(f'{WHISPER_API_ENDPOINT}/message/send', json=payload)

# Parse the response and extract the ChatGPT response
chatgpt_response = response.json()['response']

# Define the language for the text-to-speech conversion
LANGUAGE = 'fr'

# Define the filename for the output audio file
AUDIO_FILE_NAME = 'chatgpt_output.mp3'

# Use the gTTS library to convert the ChatGPT response to speech
tts = gTTS(text=chatgpt_response, lang=LANGUAGE)

# Save the speech output to an audio file
tts.save(AUDIO_FILE_NAME)

# Load the audio file using the pydub library
audio = AudioSegment.from_file(AUDIO_FILE_NAME)

# Play the audio file using the default audio player
audio.export(out_f=os.devnull).close()  # Required to avoid issue with audio playback on some systems
audio.export(f"{AUDIO_FILE_NAME}.wav", format='wav')
os.system(f"aplay {AUDIO_FILE_NAME}.wav")

# Clean up temporary audio files
os.remove(AUDIO_FILE_NAME)
os.remove(f"{AUDIO_FILE_NAME}.wav")

16 Dec 2022

How To Deal With A Chimney Intruder: Santa Self Defense

As Christmas Eve approaches, many homeowners are left wondering how they can defend their homes from the annual invasion of the jolly old man known as Santa Claus. Here are a few tips on how to keep the chimney intruder at bay:

  1. Set up a security camera near the chimney to catch Santa in the act. With the footage, you’ll be able to prove to the authorities that Santa is a trespasser and have him arrested for breaking and entering.

  2. Install a motion-activated sprinkler system above the chimney. When Santa tries to slide down the chimney, he’ll be caught in a deluge of water and be forced to retreat back up the chimney.

  3. Set up a series of booby traps around the chimney. These could include tripwires, net traps, or even a pit of quicksand. Just be sure to mark the traps clearly so that Santa (and any innocent bystanders) don’t get hurt.

  4. Use your home’s smart home technology to your advantage. Set up a voice command that will trigger the locks on your doors and windows to automatically lock when Santa’s jingle is detected.

  5. As a last resort, you could always just leave a note on the fireplace stating that you’ve moved to a new home and left all of your presents behind. Hopefully, Santa will get the hint and leave you alone for good.

Remember, defending your home from Santa is a serious matter. With these tips, you’ll be well on your way to a Santa-free Christmas.

16 Dec 2022

Use Python for Sentiment Analysis

Here’s an example of how you could use the Natural Language Toolkit (NLTK) to perform sentiment analysis on a list of quotes about a specific subject:

import nltk

# Download required resources from NLTK
nltk.download('vader_lexicon')
nltk.download('averaged_perceptron_tagger')

# Define a list of quotes about a specific subject
quotes = [
    "I love the way this product works!",
    "This product is great for what I need",
    "I'm so happy with this purchase",
    "This product is a game-changer",
    "I'm not a fan of this product",
    "I'm disappointed with the performance of this product",
    "I wouldn't recommend this product to a friend",
    "I'm returning this product, it's not what I expected"
]

# Use NLTK's built-in sentiment analyzer to classify the sentiment of each quote
from nltk.sentiment.vader import SentimentIntensityAnalyzer

sia = SentimentIntensityAnalyzer()

for quote in quotes:
    sentiment = sia.polarity_scores(quote)
    print(f'{quote}: {sentiment}')

This code will print out the sentiment scores for each quote, with scores ranging from -1 (most negative) to 1 (most positive). You can then use these scores to determine the overall sentiment towards the specific subject being discussed in the quotes.

Alternatively, you can use the TextBlob library to perform sentiment analysis in a similar way. Here’s an example using TextBlob:

import textblob

# Define a list of quotes about a specific subject
quotes = [ "I love the way this product works!",
           "This product is great for what I need",
           "I'm so happy with this purchase",
           "This product is a game-changer",
           "I'm not a fan of this product",
           "I'm disappointed with the performance of this product",
           "I wouldn't recommend this product to a friend",
           "I'm returning this product, it's not what I expected"]

# Use TextBlob to classify the sentiment of each quote
for quote in quotes:
    sentiment = textblob.TextBlob(quote).sentiment
    print(f'{quote}: {sentiment}')

16 Dec 2022

Using Stylometry to Determine The Author of a Quote

It is possible to determine the author of a quote by analyzing the characteristics of the writing style of the quote and comparing it to the writing styles of known authors. It is called stylometry.

Stylometry is the study of linguistic style, which involves analyzing the statistical patterns and characteristics of a person’s writing in order to identify the author or determine the authenticity of a document. It can be used to compare the writing styles of different authors or to determine the authorship of an anonymous or disputed document.

To do this in Python, you can use a library such as nltk (Natural Language Toolkit) or stylo to extract linguistic features from the quotes, such as word frequencies, n-grams, or readability scores. You can then use machine learning techniques, such as supervised learning or unsupervised learning, to train a model on the extracted features and use the model to predict the author of the quote.

To use stylometry to determine the author of a quote using Python, you would need to do the following:

  1. Collect a set of quotes by the two authors that you want to compare. These quotes should be representative of the authors’ typical writing styles.

  2. Preprocess the quotes by removing any non-linguistic elements (e.g. punctuation, numbers, special characters) and converting them to lowercase.

  3. Extract features from the quotes that can be used to represent the authors’ writing styles. These features could include things like word counts, word frequencies, sentence lengths, and grammatical structures.

  4. Use a machine learning algorithm to train a classifier on the feature vectors of the quotes by the two authors. This classifier should be able to predict the author of a quote based on its features.

  5. Use the trained classifier to predict the author of the quote that you want to identify.

Here is an example of a Python script that uses nltk and supervised learning to determine the author of a quote:


import nltk
from nltk.corpus import stopwords
from nltk.tokenize import word_tokenize

nltk.download('punkt')
nltk.download('wordnet')
nltk.download('omw-1.4')
nltk.download('stopwords')

# Function to extract features from a quote
def extract_features(quote):
    # Tokenize the quote and remove stop words
    tokens = word_tokenize(quote)
    filtered_tokens = [word for word in tokens if word not in stopwords.words('english')]
    
    # Compute word frequencies
    word_freq = nltk.FreqDist(filtered_tokens)
    
    # Extract features
    features = {word: word_freq[word] for word in word_freq}
    
    return features

# Training quotes
quotes = [
    ('Author 1', 'This is a quote by Author 1.'),
    ('Author 1', 'Another quote by Author 1.'),
    ('Author 2', 'This is a quote by Author 2.'),
    ('Author 2', 'Another quote by Author 2.'),
]

# Extract features from the training quotes
featuresets = [(extract_features(quote), label) for label, quote in quotes]

# Split the data into training and test sets
train_set, test_set = featuresets[:3], featuresets[3:]

# Train a classifier using the training data
classifier = nltk.NaiveBayesClassifier.train(train_set)

# Test the classifier on the test data
accuracy = nltk.classify.accuracy(classifier, test_set)
print(f'Accuracy: {accuracy:.2f}')

# Predict the author of a new quote
new_quote = 'This is a new quote.'
prediction = classifier.classify(extract_features(new_quote))
print(f'Predicted author: {prediction}')

Here is another example of a Python script that demonstrates how to use stylometry to determine the author of a quote using the above steps:

import string
from collections import Counter
from sklearn.feature_extraction.text import TfidfVectorizer
from sklearn.svm import LinearSVC

# List of quotes by two different authors
quotes = [
    ("Author 1", "This is a quote by Author 1."),
    ("Author 1", "Another quote by Author 1."),
    ("Author 2", "This is a quote by Author 2."),
    ("Author 2", "Another quote by Author 2.")
]

# Preprocess the quotes by removing non-linguistic elements and converting to lowercase
def preprocess(quote):
    # Remove punctuation and numbers
    quote = quote.translate(str.maketrans('', '', string.punctuation + string.digits))
    # Convert to lowercase
    return quote.lower()

# Extract word frequencies from the quotes
def extract_features(quotes):
    features = []
    for _, quote in quotes:
        word_counts = Counter(quote.split())
        features.append(word_counts)
    return features

# Train a classifier on the feature vectors of the quotes
def train_classifier(features, labels):
    vectorizer = TfidfVectorizer()
    X = vectorizer.fit_transform(features)
    classifier = LinearSVC()
    classifier.fit(X, labels)
    return classifier

# Preprocess the quotes
preprocessed_quotes = [(author, preprocess(quote)) for author, quote in quotes]

# Extract word frequencies from the quotes
features = extract_features(preprocessed_quotes)

# Get the labels for the quotes
labels = [author for author, _ in preprocessed_quotes]

# Train a classifier on the feature vectors
classifier = train_classifier(features, labels)

# Predict the author of a quote
quote = "This is an unknown quote."
prediction = classifier.predict([extract_features([("", quote)])[0]]

15 Dec 2022

Use an ESP32S2 as a Rubberducky AKA BadUSB

Download and install CircuitPython.

Create a file named code.py onto the ESP32S2 with this content:

import usb_hid
import time
from adafruit_hid.keyboard import Keyboard
from adafruit_hid.keycode import Keycode
from adafruit_hid.keyboard_layout_us import KeyboardLayoutUS
from adafruit_hid.consumer_control import ConsumerControl
from adafruit_hid.consumer_control_code import ConsumerControlCode

time.sleep(1)
kbd = Keyboard(usb_hid.devices)
layout = KeyboardLayoutUS(kbd)
cc = ConsumerControl(usb_hid.devices)

layout.write('Hello World!\n') # send string with new-line
#kbd.send(Keycode.SHIFT, Keycode.A)  # Type capital 'A'
#kbd.send(Keycode.CONTROL, Keycode.A)  # control-A key

18 Feb 2022

Download the Apothecary MicroLab Plans

Download the Apothecary MicroLab Plans, a bioreactor to make your own medecine to thwart Big Pharma’s price-gouging.

18 Jan 2022

Automatically Start/Stop Motion Activated Camera When Cellphone Not On Local Network

Automatically Start/Stop Motion Activated Camera When Cellphone Not On Local Network

Note: This Systemd service will detect if your mobile phone is on the local network using ping, therefore, it should have a static IP address when it connects to your Wi-Fi network.

  1. ~/.config/systemd/user/surveillance-system.service

     [Unit]
     Description=Automatically Start/Stop Surveillance System if phone not on local network
     Wants=surveillance-system.timer
    
     [Service]
     Type=simple
     ExecStart=/home/USERNAME/.config/systemd/user/start-motion-detection.sh
    
     [Install]
     WantedBy=multi-user.target
    
  2. ~/.config/systemd/user/surveillance-system.timer (check for mobile phone presence every minute)

     [Unit]
     Description=Automatically Start/Stop Surveillance System if phone not on local network
    
     [Timer]
     OnCalendar=*:0/1
    
     [Install]
     WantedBy=timers.target
    
  3. ~/.config/systemd/user/start-motion-detection.sh

     #!/bin/bash
     XDG_RUNTIME_DIR=/run/user/$(id -u)
     DBUS_SESSION_BUS_ADDRESS=unix:path=${XDG_RUNTIME_DIR}/bus
     export DBUS_SESSION_BUS_ADDRESS XDG_RUNTIME_DIR
    
     ping -W 1 -c 1 192.168.0.20 > /dev/null
     if [ $? -ne 0 ]; then # Host is down, start motion
       echo "Host is down..."
         if pgrep -x "motion" >/dev/null
         then
           echo "Motion already running..."
         else
           echo "Motion is not running, sarting it..."
           motion
         fi
    
     else # Host is up, stop processes
       echo "Host is up..."
       if pgrep -x "motion" >/dev/null
       then
         echo "Stopping Motion..."
         killall motion
       else
         echo "Motion is not running."
       fi
     fi
    
  4. Commands to start the service and check its status:

     systemctl --user enable surveillance-system.timer --now
     systemctl --user start surveillance-system.timer --now
     systemctl --user list-timers
     systemctl --user status surveillance-system
    
  5. I hade issues where the phone would not connect to Wi-Fi fast enought when I was in range of the router, and it helped when I did this:

    In LineageOS 18.1 > Network & internet > Wi-Fi > Wi-Fi preferences > toggle On: Turn on Wi-Fi automatically: “Wi-Fi will turn back on near high-quality saved networks, like your home network”. (unfortunately, this requires location to be turned ON, also)

18 Jan 2022

Motion Activated Security Camera With Audio Backed Up To VPS

Motion Activated Security Camera With Audio Automatically Backed Up To VPS

This will be achieved using the great softwares motion and ffmpeg.

  1. Create ~/.motion/motion.conf (at least the camera resolution and USERNAME in paths should be edited and possibly the sensitivy of the motion detection)

     # Rename this distribution example file to motion.conf
     #
     # This config file was generated by motion 4.4.0
     # Documentation:  /usr/share/doc/motion/motion_guide.html
     #
     # This file contains only the basic configuration options to get a
     # system working.  There are many more options available.  Please
     # consult the documentation for the complete list of all options.
     #
    
     ############################################################
     # System control configuration parameters
     ############################################################
    
     # Start in daemon (background) mode and release terminal.
     daemon off
    
     # Start in Setup-Mode, daemon disabled.
     setup_mode off
    
     # File to store the process ID.
     ; pid_file value
    
     # File to write logs messages into.  If not defined stderr and syslog is used.
     ; log_file value
    
     # Level of log messages [1..9] (EMG, ALR, CRT, ERR, WRN, NTC, INF, DBG, ALL).
     log_level 6
    
     # Target directory for pictures, snapshots and movies
     target_dir /home/USERNAME/motion
    
     # Video device (e.g. /dev/video0) to be used for capturing.
     video_device /dev/video0
    
     # Parameters to control video device.  See motion_guide.html
     ; vid_control_params value
    
     # The full URL of the network camera stream.
     ; netcam_url value
    
     # Name of mmal camera (e.g. vc.ril.camera for pi camera).
     ; mmalcam_name value
    
     # Camera control parameters (see raspivid/raspistill tool documentation)
     ; mmalcam_control_params value
    
     ############################################################
     # Image Processing configuration parameters
     ############################################################
    
     # Image width in pixels.
     width 1920
    
     # Image height in pixels.
     height 1080
    
     # Maximum number of frames to be captured per second.
     framerate 15
    
     # Text to be overlayed in the lower left corner of images
     text_left CAMERA1
    
     # Text to be overlayed in the lower right corner of images.
     text_right %Y-%m-%d\n%T-%q
    
     ############################################################
     # Motion detection configuration parameters
     ############################################################
    
     # Always save pictures and movies even if there was no motion.
     emulate_motion off
    
     # Threshold for number of changed pixels that triggers motion.
     threshold 11000
    
     # Noise threshold for the motion detection.
    
     noise_level 32
    
     # Despeckle the image using (E/e)rode or (D/d)ilate or (l)abel.
     despeckle_filter EedDl
    
     # Number of images that must contain motion to trigger an event.
     minimum_motion_frames 1
    
     # Gap in seconds of no motion detected that triggers the end of an event.
     event_gap 1
    
     # The number of pre-captured (buffered) pictures from before motion.
     pre_capture 0
    
     # Number of frames to capture after motion is no longer detected.
     post_capture 20
    
     ############################################################
     # Script execution configuration parameters
     ############################################################
    
    
     # save microphone straight to vps: ffmpeg -nostdin -f alsa -i pulse -c:a libmp3lame -ar 44100 -b:a 128k -ac 1 -f mp3 - | ssh -C vps "cat - > /var/www/cams/output-$(date '+%s').mp3"
     on_event_start ffmpeg -nostdin -f alsa -i pulse -c:a libmp3lame -ar 44100 -b:a 128k -ac 1 -f mp3 /home/USERNAME/motion/%Y%m%d%H%M%S.mp3 &
    
     # merge video and audio : ffmpeg -i 20220105202755.mkv -i 20220105202755.mp3 -c:v copy -c:a aac output.mkv
     # on_event_end  pkill -f ffmpeg ; /usr/bin/rsync -av --delete --progress /home/USERNAME/motion/ vps:/var/www/motion/ #USE SCRIPT BELOW INSTEAD
     on_event_end /home/USERNAME/.motion/event_end.sh
    
    
     # Command to be executed when a movie file is closed.
     ; on_movie_end value
    
     ############################################################
     # Picture output configuration parameters:
     ############################################################
    
     # Output pictures when motion is detected
     picture_output off
    
     # File name(without extension) for pictures relative to target directory
     picture_filename %Y%m%d%_H%M%S-%q
    
     ############################################################
     # Movie output configuration parameters
     ############################################################
    
     # Create movies of motion events.
     movie_output on
    
     # Maximum length of movie in seconds.
     movie_max_time 60
    
     # The encoding quality of the movie. (0=use bitrate. 1=worst quality, 100=best)
     movie_quality 0
    
     # Container/Codec to used for the movie. See motion_guide.html
     movie_codec mkv
    
     # File name(without extension) for movies relative to target directory
     movie_filename %Y%m%d%_H%M%S
    
     ############################################################
     # Webcontrol configuration parameters
     ############################################################
    
     # Port number used for the webcontrol.
     webcontrol_port 8080
    
     # Restrict webcontrol connections to the localhost.
     webcontrol_localhost on
    
     # Type of configuration options to allow via the webcontrol.
     webcontrol_parms 0
    
     ############################################################
     # Live stream configuration parameters
     ############################################################
    
     # The port number for the live stream.
     stream_port 8081
    
     # Restrict stream connections to the localhost.
     stream_localhost on
    
     ##############################################################
     # Camera config files - One for each camera.
     ##############################################################
     ; camera /usr/etc/motion/camera1.conf
     ; camera /usr/etc/motion/camera2.conf
     ; camera /usr/etc/motion/camera3.conf
     ; camera /usr/etc/motion/camera4.conf
    
     ##############################################################
     # Directory to read '.conf' files for cameras.
     ##############################################################
     ; camera_dir /usr/etc/motion/conf.d
    
  2. Create ~/.motion/event_end.sh and make it executable

     #!/bin/bash
    
     echo "Killing ffmpeg... (stop audio recording)"
     pkill -2 ffmpeg
     echo "Copying files to VPS..."
     /usr/bin/rsync -av --delete --progress /home/USERNAME/motion/ vps:/var/www/motion/
    

18 Jan 2022

Photos - Mexican Masks Portray Covid/Corona Virus

Photos - Mexican Masks

PHOTOS: Mexican Masks Portray COVID As A Tiger, A Devil, A Blue-Eyed Man

mexican corona mask

23 Aug 2021

Flite Test FT Dart Letter Size

Flite Test FT Dart Letter Size PDF

Print at 100% scale on letter paper and double check the scale on first page (Original A4 File).

02 Apr 2021

Combine WAV files using FFmpeg

Combine WAV files using FFmpeg

ffmpeg -i input1.wav -i input2.wav -i input3.wav \
-filter_complex '[0:0][1:0][2:0]concat=n=4:v=0:a=1[out]' \
-map '[out]' output.wav

02 Apr 2021

Create video from WAV file and use an image as the background using FFmpeg

Create video from WAV file and use an image as the background using FFmpeg

ffmpeg -loop 1 -y -i image.png -i input.wav -shortest -acodec copy -vcodec mjpeg result.avi

05 Jun 2019

Bash Script to Automatically Restart and Resume Failed rsync Transfers

Bash Script to Automatically Restart and Resume Failed rsync Transfers

#!/bin/bash
# automatically restart and resume rsync transfer on failure
 
while [ 1 ]
do
    rsync --progress --partial-dir=.rsync-partial rsync://site.onion/dir/Inventory1.rar ./
    if [ "$?" = "0" ] ; then
        echo "rsync completed normally"
        exit
    else
        echo "rsync failure. Retrying soon..."
        sleep 30
    fi
done

05 Apr 2019

Setup password-store on multiple computers using gitlab for synchronizing password repository

Setup pass on multiple computers

Instructions:

  1. Create GPG Key

     gpg --full-generate-key
     gpg -k
     gpg --export-secret-key 6002450973C62F2FD9F8353101C4ECCB53ACCE05 > key-gpg-pws.private
    

    Note: Copy the private key to all of your devices.

  2. Initialize git repository on first computer and gitlab (create new project on gitlab first)

     pass init 6002450973C62F2FD9F8353101C4ECCB53ACCE05
     pass git init
     pass git remote add origin ssh://git@gitlab.com/username/pws
     pass insert email/gmail.com
     pass insert forum/reddit.com
     pass git push origin master
    
  3. Setup additional computer

     gpg --import 6002450973C62F2FD9F8353101C4ECCB53ACCE05
     git clone ssh://git@gitlab.com/username/pws ~/.password-store
    

Compatible client list can be found at: https://www.passwordstore.org/ (including ones for Android and iOS)

Note: I will probably go with Bitwarden or KeepassXC instead because this one would not encrypt the paths to the passwords…

03 Jul 2018

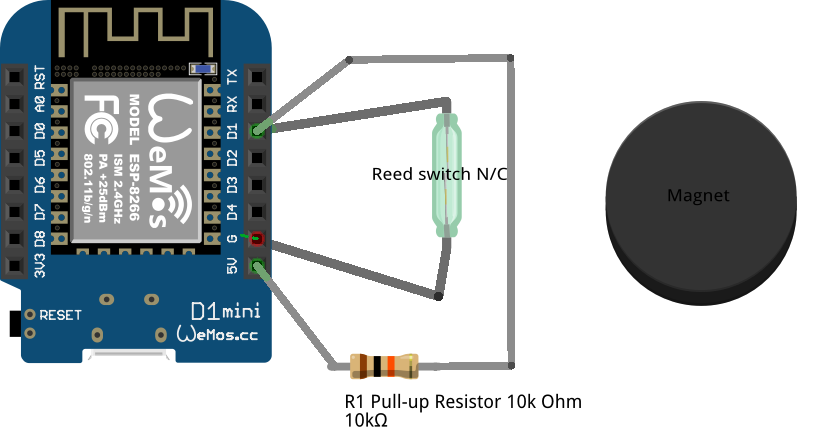
Door Alarm Using ESP8266, MicroPython and a Reed Switch (Email Alerts)

Get email alerts when a door is opened or closed.

Requirements: ESP8266 compatible board, a Reed switch, a magnet, some wires and a USB cable (and a computer).

Schematic: One side of the reed switch connected to the ground and the other side to Pin D1 of the D1-Mini board (Pin 5 for ESP8266) and a 10k Ohm pull-up resistor. Schematic, D1-Mini/Reed Switch

Instructions:

  1. Install MicroPython on your ESP8266 board:

    • Connect board to your computer using a USB cable

    • Download MicroPython’s current firmware:

    • Install esptool:

        pip install --user esptool
      
    • Install ampy (Fedora):

        sudo dnf install ampy
      
    • Erase board’s flash:

        esptool.py --port /dev/ttyUSB0 erase_flash
      
    • Install new firmware:

        esptool.py --port /dev/ttyUSB0 --baud 460800 write_flash --flash_size=detect 0 esp8266-20xxxxxx-vx.x.x.bin
      
  2. Setup webrpl

     picocom /dev/ttyUSB0 -b115200 -t "$(echo -ne '\r\nimport webrepl_setup\r\n')"
     press <e> and set your_password
     press <y> to reboot
    
  3. Install alarm code (the code can be found below):

    • Setup the board to act as a Wi-Fi client at boot time (change SSID and wifi_password before uploading):

        ampy --port /dev/ttyUSB0 put boot.py
      
    • Install alarm code (change email and email_password):

        ampy --port /dev/ttyUSB0 put main.py
      
    • Reboot board to make changes effective:

        picocom /dev/ttyUSB0 -b115200 -t "$(echo -ne '\r\nimport machine\r\nmachine.reset()\r\n')"
      

boot.py (setup webrepl and Wi-Fi):

import gc
import webrepl
import network

# change the value of the 2 variables below
ssid = "your_SSID"
pwd  = "wifi_password"

webrepl.start()
gc.collect()
sta_if = network.WLAN(network.STA_IF)
ap_if  = network.WLAN(network.AP_IF)
ap_if.active(False)
if not sta_if.isconnected():
  print('Connecting to WiFi...')
  sta_if.active(True)
  sta_if.connect(ssid, pwd)
  while not sta_if.isconnected():
    pass$
print('network config:', sta_if.ifconfig()

main.py (credit):

import machine
from time import sleep
# Micropython
try:
  import usocket as socket
  import ussl as ssl

# Python3
except:
  import socket
  import ssl

try:
    switch = machine.Pin(5, machine.Pin.IN) # D1/GPIO5
except:
    print("s:e")
    switch = 0 # open

prevValue      = 0
doorOpenTimer  = 0
email_user     = "user@gmail.com"
email_pwd      = "my_password"
email_user_b64 = "xxxxxxxxxxxxxxxxxxxxxx=" # base64 encoded email    (echo -n 'user@gmail.com' | base64)
email_pwd_b64  = "xxxxxxxxxxxxxxxxxxxxxx=" # base64 encoded password (echo -n 'my_password' | base64)

def send_email(username, subject, body):
    msg = """To: {0}\r\nSubject: {1}

    {2}
    """
    msg = msg.format(username,subject,body)

    endmsg = "\r\n.\r\n"

    mailserver = "smtp.gmail.com"
    port = 587

    # Create socket called clientSocket and establish a TCP connection with mailserver
    clientSocket = socket.socket()
    clientSocket.connect(socket.getaddrinfo(mailserver, port)[0][-1])
    recv = clientSocket.recv(1024)
    print(recv)
    print(recv[:3])
    if recv[:3] != b'220':
        print('220 reply not received from server.')

    # Send HELO command and print server response.
    heloCommand = 'EHLO Alice\r\n'
    clientSocket.send(heloCommand.encode())
    recv1 = clientSocket.recv(1024)
    recvCount=recv1.decode().count('\n')
    print(recv1)
    if recv1[:3] != b'250':
        print('250 reply not received from server.')

    # Request an encrypted connection
    startTlsCommand = 'STARTTLS\r\n'
    clientSocket.send(startTlsCommand.encode())
    tls_recv = clientSocket.recv(1024)
    print(tls_recv)
    if tls_recv[:3] != b'220':
        print('220 reply not received from server')

    # Encrypt the socket
    ssl_clientSocket = ssl.wrap_socket(clientSocket)
    print("Secure socket created")

    heloCommand = 'EHLO Alice\r\n'
    ssl_clientSocket.write(heloCommand.encode())
    recv1=''
    for index in range(0,recvCount):
      recv1 = recv1+ssl_clientSocket.readline().decode()
    print(recv1)

    # Send the AUTH LOGIN command and print server response.
    authCommand = 'AUTH LOGIN\r\n'
    ssl_clientSocket.write(authCommand.encode())
    auth_recv = ssl_clientSocket.readline()
    print(auth_recv)
    if auth_recv[:3] != b'334':
        print('334 reply not received from server')

    print("Sending username / password")
    # Send username and print server response.
    uname = email_user_b64 # base64 encoded email
    pword = email_pwd_b64  # base64 encoded password
    print(str(uname))
    ssl_clientSocket.write(uname)
    ssl_clientSocket.write('\r\n'.encode())
    uname_recv = ssl_clientSocket.readline()
    print(uname_recv)
    if uname_recv[:3] != b'334':
        print('334 reply not received from server')
    print(str(pword))
    ssl_clientSocket.write(pword)
    ssl_clientSocket.write('\r\n'.encode())
    pword_recv = ssl_clientSocket.readline()

    print(pword_recv)
    if pword_recv[:3] != b'235':
        print('235 reply not received from server')

    # Send MAIL FROM command and print server response.
    mailFromCommand = 'MAIL FROM: <' + username + '>\r\n'
    ssl_clientSocket.write(mailFromCommand.encode())
    recv2 = ssl_clientSocket.readline()
    print(recv2)
    if recv2[:3] != b'250':
        print('250 reply not received from server.')

    # Send RCPT TO command and print server response.
    rcptToCommand = 'RCPT TO: <' + username + '>\r\n'
    ssl_clientSocket.write(rcptToCommand.encode())
    recv3 = ssl_clientSocket.readline()
    print(recv3)
    if recv3[:3] != b'250':
        print('250 reply not received from server.')

    # Send DATA command and print server response.
    dataCommand = 'DATA\r\n'
    ssl_clientSocket.write(dataCommand.encode())
    recv4 = ssl_clientSocket.readline()
    print(recv4)
    if recv4[:3] != b'354':
        print('354 reply not received from server.')

    # Send message data.
    ssl_clientSocket.write(msg.encode())

    # Message ends with a single period.
    ssl_clientSocket.write(endmsg.encode())
    recv5 = ssl_clientSocket.readline()
    print(recv5)
    if recv5[:3] != b'250':
        print('250 reply not received from server.')

    # Send QUIT command and get server response.
    quitCommand = 'QUIT\r\n'
    ssl_clientSocket.write(quitCommand.encode())
    recv6 = ssl_clientSocket.readline()
    print(recv6)
    if recv6[:3] != b'221':
        print('221 reply not received from server.')

    clientSocket.close()

while True:
    sleep(1)
    print("s.v.: " + str( switch.value() ) )
    if prevValue != switch.value():
        if switch.value() == 0: # door opened
            send_email(email_user, "Door Opened", prevValue)
        if switch.value() == 1: # door closed
            send_email(email_user, "Door Closed", prevValue)
        try:
            prevValue = switch.value()
        except:
            prevValue = -1

25 May 2017

Fedora 25: Fix iptables rules after replacing the firewalld service with iptables.service

If the internet is not working in your Gnome Boxes/qemu virtual machine guest after replacing the firewalld service with the iptables.service in the host OS, it might be because the iptables rules relating to the virbr0 interface and the 192.168.122.0/24 network are missing.

Edit /etc/sysconfig/iptables

:~$ sudo vim /etc/sysconfig/iptables

Add the following lines before the line : -A INPUT -j REJECT –reject-with icmp-host-prohibited

-A INPUT -i virbr0 -p udp -m udp --dport 53 -j ACCEPT
-A INPUT -i virbr0 -p tcp -m tcp --dport 53 -j ACCEPT
-A INPUT -i virbr0 -p udp -m udp --dport 67 -j ACCEPT
-A INPUT -i virbr0 -p tcp -m tcp --dport 67 -j ACCEPT
-A FORWARD -d 192.168.122.0/24 -o virbr0 -m conntrack --ctstate RELATED,ESTABLISHED -j ACCEPT
-A FORWARD -s 192.168.122.0/24 -i virbr0 -j ACCEPT
-A FORWARD -i virbr0 -o virbr0 -j ACCEPT
-A FORWARD -o virbr0 -j REJECT --reject-with icmp-port-unreachable
-A FORWARD -i virbr0 -j REJECT --reject-with icmp-port-unreachable
-A OUTPUT -o virbr0 -p udp -m udp --dport 68 -j ACCEPT
-A POSTROUTING -o virbr0 -p udp -m udp --dport 68 -j CHECKSUM --checksum-fill
-A POSTROUTING -s 192.168.122.0/24 -d 224.0.0.0/24 -j RETURN
-A POSTROUTING -s 192.168.122.0/24 -d 255.255.255.255/32 -j RETURN
-A POSTROUTING -s 192.168.122.0/24 ! -d 192.168.122.0/24 -p tcp -j MASQUERADE --to-ports 1024-65535
-A POSTROUTING -s 192.168.122.0/24 ! -d 192.168.122.0/24 -p udp -j MASQUERADE --to-ports 1024-65535
-A POSTROUTING -s 192.168.122.0/24 ! -d 192.168.122.0/24 -j MASQUERADE

Restart the iptables service

 :~$ sudo /bin/systemctl restart  iptables.service

16 Apr 2017

RaspberryPi Infrared Remote Control, Controlled Using a Web Server

DRAFT

TV Remote

  1. Setup electronic; 1x 200ohm resistor, 1x 10k ohm resistor, 1x transistor (any NPN should work) and 1 Infrared LED (http://www.raspberry-pi-geek.com/Archive/2015/10/Raspberry-Pi-IR-remote)

    Fig 1 Fig 2

  2. Install and configure lirc

    sudo apt-get install lirc

    sudo nano /etc/modules

     # /etc/modules: kernel modules to load at boot time.
     #
     # This file contains the names of kernel modules that should be loaded
     # at boot time, one per line. Lines beginning with "#" are ignored.
    
     lirc_dev
     lirc_rpi gpio_out_pin=22
    

    sudo nano /etc/lirc/hardware.conf

     # /etc/lirc/hardware.conf
     #
     # Arguments which will be used when launching lircd
     LIRCD_ARGS="--uinput"
    
     #Don't start lircmd even if there seems to be a good config file
     #START_LIRCMD=false
    
     #Don't start irexec, even if a good config file seems to exist.
     #START_IREXEC=false
    
     #Try to load appropriate kernel modules
     LOAD_MODULES=true
    
     # Run "lircd --driver=help" for a list of supported drivers.
     DRIVER="default"
     # usually /dev/lirc0 is the correct setting for systems using udev
     DEVICE="/dev/lirc0"
     MODULES="lirc_rpi"
    
     # Default configuration files for your hardware if any
     LIRCD_CONF=""
     LIRCMD_CONF=""
    

    Create a configuration file for your remote (http://lirc-remotes.sourceforge.net/remotes-table.html). Here’s mine for a Sharp Aquos TV:

     # brand:                       Sharp
     # model no. of remote control: GA840WJSA
     # devices being controlled by this remote: Sharp Aquos LED TV
     #
    
     begin remote
    
         name  Sharp
         bits           15
         flags SPACE_ENC|CONST_LENGTH
         eps            30
         aeps          100
    
         one           320  1750
         zero          320   700
         ptrail        321
         gap          64241
         toggle_bit_mask 0x0
         toggle_mask    0x3FF
         min_repeat    2
    
         begin codes
             KEY_POWER                0x41A2
             KEY_DISPLAY              0x4362
             KEY_POWER_SOURCE         0x460E
             KEY_REWIND               0x448E
             KEY_PLAY                 0x450E
             KEY_FASTFORWARD          0x468E
             KEY_PAUSE                0x46CE
             KEY_PREV_CHAPTER         0x44CE
             KEY_STOP                 0x470E
             KEY_NEXT_CHAPTER         0x474E
             KEY_RECORD               0x458E
             KEY_OPTION               0x444E
             KEY_SLEEP                0x4162
             KEY_POWER_SAVING         0x47B2
             KEY_REC_STOP             0x478E
             KEY_1                    0x4202
             KEY_2                    0x4102
             KEY_3                    0x4302
             KEY_4                    0x4082
             KEY_5                    0x4282
             KEY_6                    0x4182
             KEY_7                    0x4382
             KEY_8                    0x4042
             KEY_9                    0x4242
             KEY_DOT                  0x4572
             KEY_0                    0x4142
             KEY_ENT                  0x4342
             KEY_CC                   0x40B2
             KEY_AV_MODE              0x407E
             KEY_VIEW_MODE            0x4016
             KEY_FLASHBACK            0x43D2
             KEY_MUTE                 0x43A2
             KEY_VOLUMEUP             0x40A2
             KEY_VOLUMEDOWN           0x42A2
             KEY_CHANNELUP            0x4222
             KEY_CHANNELDOWN          0x4122
             KEY_INPUT                0x4322
             KEY_AQUOS_NET            0x4726
             KEY_MENU                 0x4012
             KEY_DOCK                 0x475A
             KEY_UP                   0x43AA
             KEY_LEFT                 0x42BE
             KEY_ENTER                0x43BE
             KEY_RIGHT                0x41BE
             KEY_DOWN                 0x406A
             KEY_EXIT                 0x433E
             KEY_RETURN               0x40BE
             KEY_FAVORITE             0x47C6
             KEY_SURROUND             0x41DA
             KEY_AUDIO                0x4062
             KEY_FREEZE               0x432A
             KEY_RED                  0x4236
             KEY_GREEN                0x42C9
             KEY_YELLOW               0x4336
             KEY_BLUE                 0x40B6
    
         end codes
    
     end remote
    
  3. Reboot and start lircd

     sudo reboot
     sudo lircd --device /dev/lirc0
    
  4. Test lircd, send number 1

     irsend SEND_ONCE Sharp key_1
    
  5. Setup uwsgi server (https://www.digitalocean.com/community/tutorials/how-to-serve-flask-applications-with-uwsgi-and-nginx-on-ubuntu-14-04)

     sudo apt-get update
     sudo apt-get install python-pip python-dev
     sudo pip install virtualenv
     mkdir ~/tvremote
     cd ~/tvremote
     virtualenv tvremoteenv
     source tvremoteenv/bin/activate
     pip install uwsgi flask
    
  6. Install Static files

    extract this archive into your home directory ~/tvremote.

  7. Create and start uwsgi service (https://blog.frd.mn/how-to-set-up-proper-startstop-services-ubuntu-debian-mac-windows/)

     sudo cp ~/tvremote/uwsgi /etc/init.d/
     sudo update-rc.d uwsgi defaults
     sudo service uwsgi start
    
  8. Ready to test, point browser to your RPi’s IP address

     http://192.168.2.51:8080/index.html
    

Remote control screenshot

09 Jan 2017

Essential knots

19 Jul 2016

Stream Youtube to RaspberryPi From Remote Computer Using Omxplayer

Stream Youtube to RaspberryPi From Remote Computer Using Omxplayer

~/$ omxplayer -b `/usr/local/bin/youtube-dl -g https://www.youtube.com/watch?v=ID`